.
.
A project and at least one cell for that project must exist to generate sample. Generation is a two-step process. The first step involves reviewing detailed information about the set of exchanges that define the sampling frame. In the first step, the "weight" or Measure of Size (MOS) of the sampling frame can be altered, and the working bank threshold (number of known listings per working bank) for the set of exchanges can be adjusted. The information gathered here is used in the second step of the generation process, where the amount of sample to be generated and the method of generation are specified, along with other parameters.
To generate sample, click the Generate button .
-- or --
On the Generate menu, click Random.

A Cell Statistics dialog box opens.
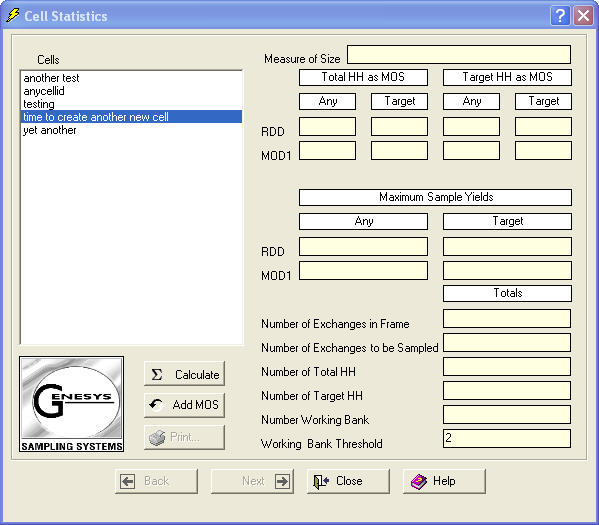
This is the first of two dialog boxes contained in the generation routine. The cells displayed belong to the current project. To generate sample for a cell, cell statistics must first be calculated for that cell.
To select a cell from the Cells list, either double-click it, or click it and then click Calculate  . This calculates the cell statistics, which are known (and referred to) collectively as the Hit Rates, or the Hit Rate table.

The Hit Rate table provides estimated Household Hit Rates (and incidence rates for targeted and small-area frames) for RDD and MOD1, the two Virtual Genesys generation methods. The hit rates will vary based on the MOS used and the method of generation selected. Refer to Genesys Sampling System Methodology (Marketing Systems Group, REV. 8/97) for a detailed description of the generation methodologies and the affects of adjusting the Measure of Size.
The first part of the Hit Rate table consists of four columns of data grouped under Total Households.
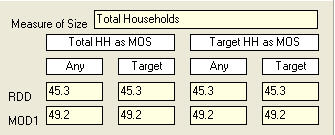
These figures are an estimate of the percentage of the generated sample that will yield a household contact, prior to any additional screening. The four columns in the Hit Rate table are divided into one set of Any and Target columns under Total HH as MOS and another set of Any and Target columns under Target HH as MOS. (HH stands for households.)
Any: Represents an estimated percentage of the sample that is composed of households. For MOD1, the MOS is Total Households.
Target: Represents an estimated percentage of the sample that will be a specific type of household based on the MOS. For MOD1, the MOS is Total Households. (For example, the exchanges are sampled based on the number of Total Households they serve.)
Any: Represents an estimated percentage of the sample that is composed of households. For the Modified Methods, the MOS is Target Households, and the exchanges are sampled based on the number of Target Households they serve.
Target: Represents an estimated percentage of the sample that will not only be a household, but will also be the type of household specified. For the modified methods, the MOS is Target Households, and the exchanges are sampled based on the number of Target Households they serve.
The second section of the Hit Rate table shows the Maximum Sample Yields for each generation method.
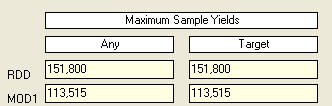
This is the maximum number of 10-digit phone numbers that can be generated from the selected cell. The maximum sample yields vary based on the generation method used (RDD or MOD1) and whether the MOS is Total Households (Any) or Target Households. With the RDD method, the Maximum Sample Yields are always based on the total number of working banks. This figure is calculated by multiplying Working Banks by 100.
With MOD1 method, the Maximum Sample Yields will always be less than with the RDD method, because telephone numbers have unequal probabilities of selection with these methodologies.
The third part of the table displays exchange and household information for the selected cell.
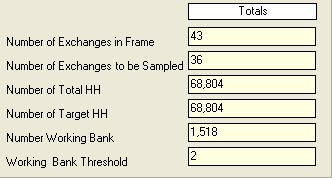
Number of Exchanges in Sampling Frame: Total number of exchanges for the selected cell, based on the defined geographic/demographic parameters and Working Bank Threshold. The sample will be generated from this set of exchanges.
Number of Exchanges to be Sampled: Total number of exchanges still included in the sampling frame after the Working Bank Threshold has been applied, as well as any cutoffs. The sample will be generated from these exchanges.
Number of Total HHs: Estimated number of total households served by the exchanges for the selected cell.
Number of Target HHs: If the MOS is not total households, then this figure represents the total number of target households for the selected cell as defined by the MOS.
Number of Working Banks: Total number of 100-series banks that are considered working for the selected cell.
Working Bank Threshold (also known as bank density): Number of listed households that a 100-series bank must contain for that bank to be considered a Working Bank.
After the cell statistics have been calculated, the MOS can be altered. Such changes should be made carefully based on the objectives of the project, as they can have a serious impact on the sample produced. The default MOS for MOD1 is Total Households. If a demographic overlay has been applied to a cell, the MOS will be calculated based on that overlay and will be reflected in the Measure of Size group box at the top of the Cell Statistics dialog box.
Click Add MOS  . A Measure of Size dialog box opens.
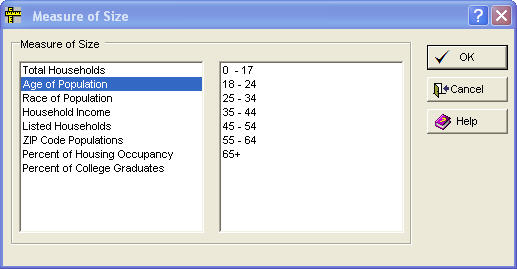
Click the demographic category to be used as the Measure of Size. The ranges for some of the demographic categories appear in the list on the right. Click the ranges to be used. Select as many ranges as needed.
Click OK  . A message appears regarding any changes. New cell statistics are calculated. The Hit Rate table is updated to reflect the new MOS.
Click Next ![]() to move from Cell Statistics to Generate, which contains a number of fields that define the final output specifications for the sample.
to move from Cell Statistics to Generate, which contains a number of fields that define the final output specifications for the sample.
Once the Hit Rate table has been populated, and the MOS and Working Bank Threshold have been set, the next step is to generate numbers.
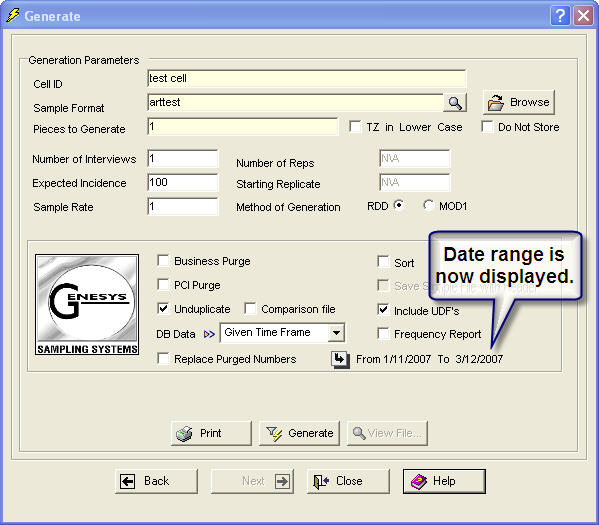
In the Generate dialog box, look under the Generation Parameters group box.
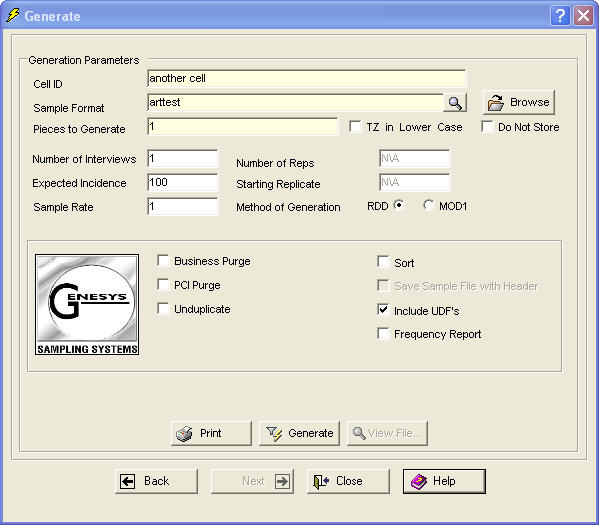
Sample Format: The format file layout to be used during generation.
Click Browse  to search for other sample formats.
Pieces to Generate: Virtual Genesys uses the following equation to calculate the number of pieces to generate: Number of Pieces = ( Number of Interviews * Sample Rate )( 100 / Expected Incidence ).
Do Not Store: If this check box is selected, Business Purge (if licensed), PCI Purge, and Unduplicate are unavailable, and data about the sample generated is not stored in the Virtual Genesys database. This can improve response time when generating a large amount of pieces. Phone numbers generated using Do Not Store can be stored in the database by using Store to Database on the Utilities menu.
Number of Interviews: Number of completed interviews required for a cell. This is also known as the quota of completes for a cell. This number must be greater than or equal to one.
Expected Incidence: This incidence rate is the estimated percent of household contacts that will qualify for the survey (based on any screening questions in the survey document). The incidence rate is entered as a whole number with up to one decimal place. This number can range from 0.5 to 100.0.
Sample Rate: Number of sample pieces needed to obtain a completed screen. A screen is defined as someone who will answer your qualifying questions, even though they may not qualify for the survey. To determine what the sample rate should be, take into account the Hit Rate (for example, what percentage of the sample will be households), the expected refusal rate, and any call rules (reflecting no-answers, callbacks, busy signals, etc.). The sampling rate is entered as a whole number with up to one decimal place. The number can range from 1.0 to 100.0.
Number of Reps (Replicates): A replicate is a representative subset of the entire sample file, where each of these subsets is representative of the original sample file. For example, if 10 percent of your entire sample file was in California, then 10 percent of the phone number in each replicate will also be in California. The number of replicates is entered as a whole number (no decimals). Numbers can range from one to 999. The number of replicates entered must be less than or equal to the number of pieces that will be generated.
Starting Replicate: The default is one. Unless this is changed, the replicate number assignment will begin with one. For example, if the number of replicates specified is 10 and the starting replicate number is one, then the sample will be put in 10 replicates numbered one to 10. For another example, if the number of replicates specified is 10, but the starting replicate number is set to five, then the sample file will be put into 10 replicates numbered five to 14. This option to change the starting replicate number is valuable when generating additional sample for a particular cell.
Method of Generation: There are two generation methods to choose from when generating random-digit-dialing (RDD) samples in Virtual Genesys. The standard Virtual Genesys RDD methodology produces a strict single stage, EPSEM (Equal Probability of Selection Method) sample of residential telephone numbers. In other words, a Virtual Genesys RDD sample ensures an equal and known probability of selection for every residential telephone number in the sampling frame. In some situations, a sampling methodology other than a strict EPSEM RDD may prove beneficial. Virtual Genesys provides an alternative RDD procedure that results in probability samples of telephone households. This method is more efficient in that it yields slightly higher proportions of households than a strict RDD methodology. While an EPSEM assigns a known and equal probability of selection to each telephone number, modified generation procedures provide a known but unequal probability of selection. The MOD1 sample generation method increases efficiency by over-sampling telephone exchanges with higher densities of households, and decreases the sampling rate in those with lower densities. PCI Purging and Business Purging (if licensed) are additional options that may be specified.
Business Purge: If licensed, this option is provided to users who choose to remove business phone numbers from their sample file.
PCI Purge: This option is provided to users who choose to remove certain numbers from their sample file. Private Citizens Incorporated (PCI) is a database of respondents who do not wish to be called by market researchers or telemarketers.
Purge against NeuStar Database: If licensed, this option (which may be unavailable and appear dimmed) is provided to users who choose to remove certain numbers from their sample file. NeuStar is a database of wireline (landline) phone numbers that have been ported to cell phones.

Unduplicate: Compares telephone numbers against previously generated samples or a known ASCII file, and removes duplicate records from the generated sample. In the Generate Dialog Box, select Unduplicate. Two check boxes and a list will appear adjacent to the Unduplicate check box. Comparison File and Replace Purged Numbers are the two check boxes. DB Data is the list.
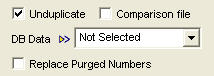
Click the arrow for DB Data. Current Cell, Current Project, All Available, and Given Time Frame will appear as options.
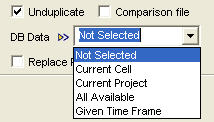
If Given Time Frame is clicked, a Time Frame Selection dialog box appears, allowing a date range to be selected.
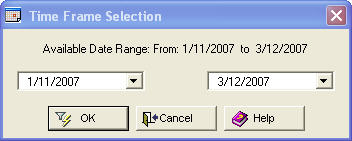
An available date range appears. Select the From and to dates and click OK  . The date range should now be displayed in the Generate dialog box.
The date range now displays.
Sort: Enables the user to sort their sample file by any field that was included in the Sample Format layout. Multiple fields can be specified. The fields' sorting order and ascending or descending direction may also be specified. Select Sort. ASelect Sorting Fields dialog box opens.
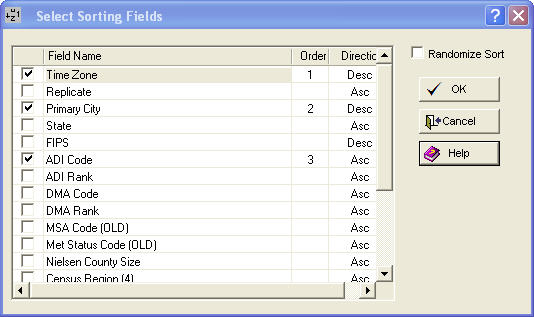
Select the Sorting Fields in the order in which they should appear, or select Randomize Sort. In the Select Sorting Fields dialog box above, Time Zone was clicked first, Primary City, second, and ADI (Area of Dominant Influence)Code, third. This order appears in the Order column. Select ascending or descending by clicking in the Direction column for the field. If the direction is ascending (Asc), clicking there will change it to descending (Desc), and visa versa.
Save Sample File with Header: Includes the Sample Format field headers in the Sample file. This option is available ONLY for sample formats that use commas and tabs as delimiters. It will otherwise be unavailable and will appear dimmed.
Include UDFs: UDF stands for User-Defined Field. If the Sample Format (listed at the top of the dialog box) contains a UDF, this check box is selected. If there is no UDF in the Sample Format, this option will be unavailable and will appear dimmed. Select Include UDFs. A User Defined Fields dialog box opens.
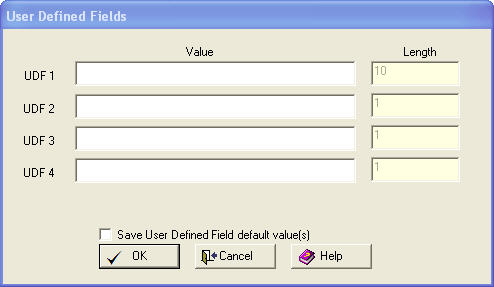
Type data into the UDFs. The fields display in the order in which they appear in the layout. Click OK .
Frequency Report: Frequency reports can be generated on any parameters included in the Sample Format. Select Frequency Report. AFrequency Report dialog box opens.
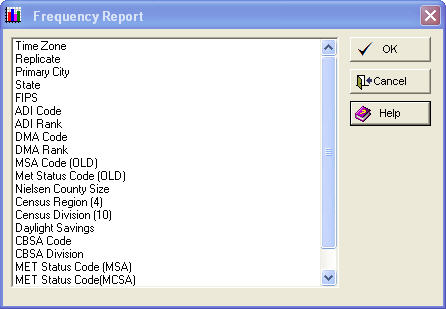
These reports show how often a given parameter appears in a sample file. Frequency enable quality control checks to ensure certain information was included in the sample file. Click a parameter to include it in the sample file. Click OK .
To start generation
Click the Generate button . A Save As dialog box opens.
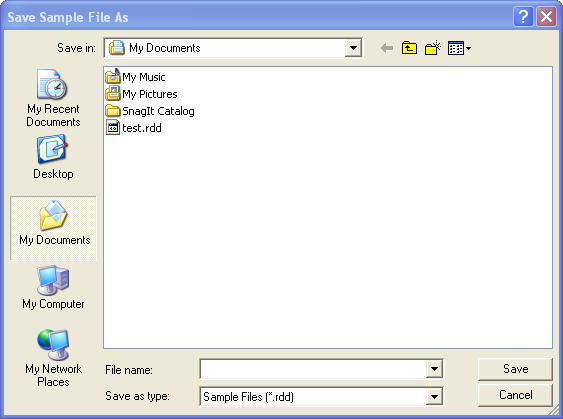
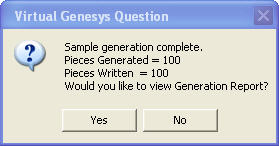
Name the file and select a directory where it will be stored. By default, Virtual Genesys will open the directory where the last sample file was stored. Type a file name, click Save  , and generation will commence. When sample generation is complete, a message will appear, indicating how much sample was generated.
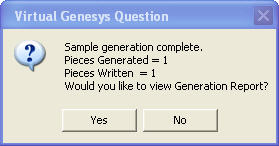
If PCI Purge or Business Purge (if licensed) was selected, the number of pieces removed from the sample is also displayed here.
Click Yes  to see the Virtual Genesys Generation Report.
The sample generation process can be stopped by clicking Stop Generation  , which appears only during the actual sample generation. The button appears at the bottom of the Generate dialog box.

If Stop Generation is clicked, a confirmation message appears.
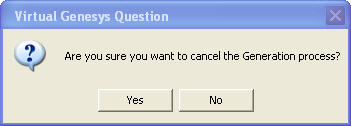
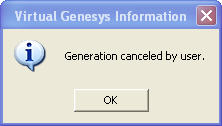
To stop generation, click Yes . Another confirmation message appears.
-- or --
Click No  . Generation finishes and a different message appears.
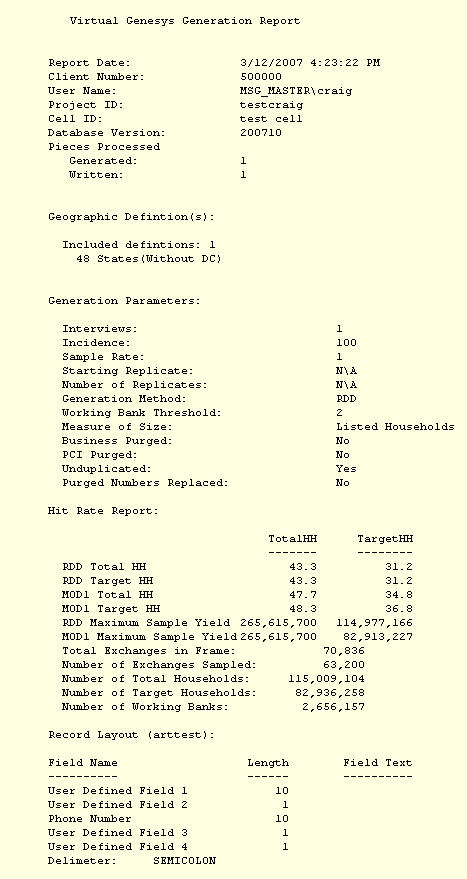
A sample of a Virtual Genesys Generation Report was provided earlier.